Showing posts with label pattern. Show all posts

Saturday, 10 October 2015

Pants for Ken

Ken's Got Pants

    In this house there are two Ken dolls, both vying for the one and only set of clothes that they happen to be in possession of. Yes, that is right, these poor boys have to share their clothes [an issue I have talked about previously with great passion].
    But the times are a changing' as I have begun making them a spare set of clothes, beginning with a pair of pants. No longer will it be a 24/7  Pants Free Friday for the Ken dolls in this house.
    And now I share with you a tutorial for making pants for this overlooked figure from Barbie-land.

Materials

  • Scrap fabric [Dad's old boxer shorts will do and if he asks where his pants went just say it was for a good cause.]
  • Thin elastic

Steps
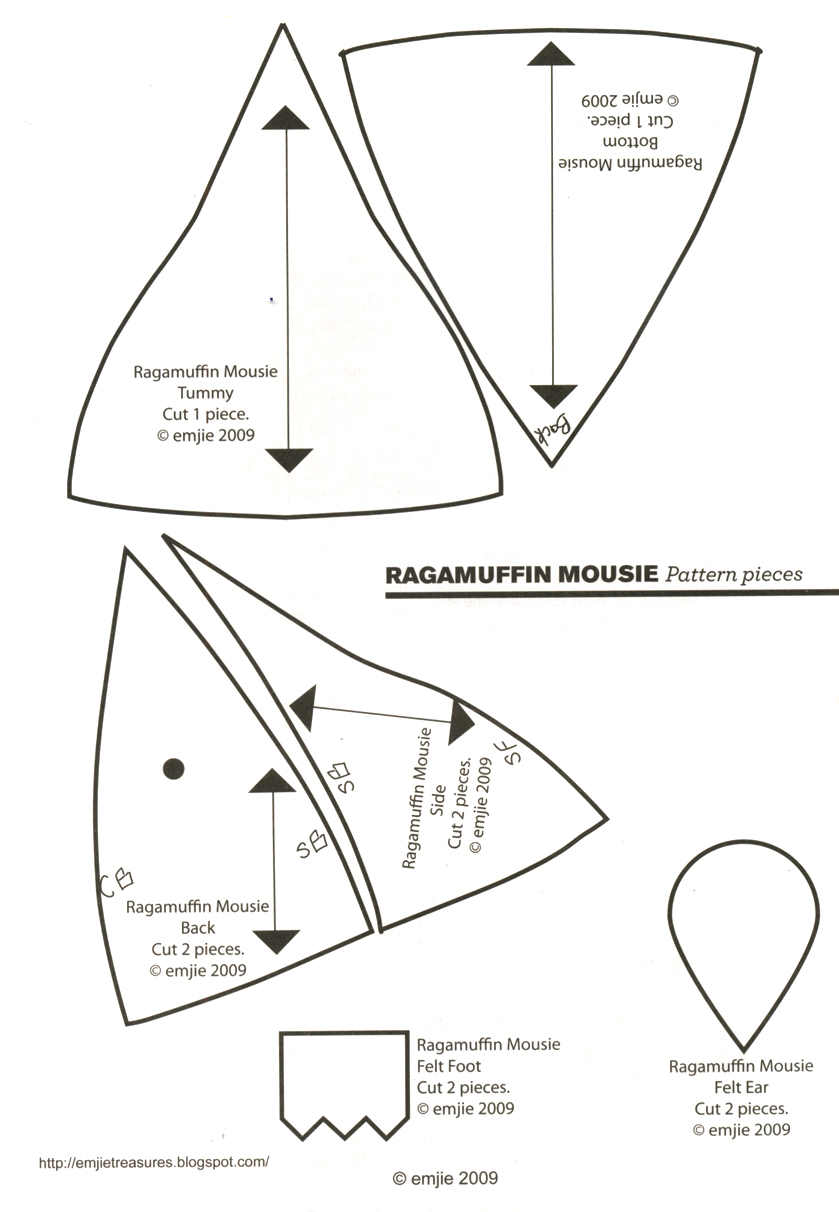
1. Print the below provided pattern [ensuring scale is correct]. Cut out the paper pattern.
2. Cut two fabric pieces from the paper pattern.
3. Fold the bottom hem of each fabric piece 5mm and stitch closed.
step 3

4. Fold each fabric piece in half and stitch up the pant leg.
step 4

5. Pin both pant legs together via the crotch. Stitch the crotch closed.
step 5

6. Fold down waistband of pants 10mm and hand stitch closed, leaving an opening no wider than 10mm.
7. Feed an elastic through waistband via the opening just made. Tie a knot in elastic to close.
step 7

8. Turn pants through and give Ken his dignity.

Print paper pattern to scale

Saturday, 12 September 2015

Ragamuffin Mousie


    Several years ago I contributed a cloth mouse pattern to Mixtape zine. The pattern appeared in issue 10.  I've been combing through my library as part of a spring clean, and I found a copy of this sweet lil' magazine.

    I now share this mouse pattern [aka Ragamuffin Mousie] with you as a free DIY craft project. All the information you would need is provided below, for print out.

Ragamuffin Mousie instructions
© Melissa Gaggiano

Ragamuffin Mousie pattern
© Melissa Gaggiano

Friday, 7 August 2015

Silly Critters

© Melissa Gaggiano
Silly Critters
    This week I have been quietly working away on a new range of sillies. I call them Silly Critters and they are possibly the quirkiest doll designs that I have come up with. Each critter is totally and utterly unique. My aim was that I not duplicate the facial expression of each little critter and that the symmetry of their faces be a little bit off. You wouldn't get that from a toy factory mass production.

© Melissa Gaggiano
Silly Critter

Saturday, 28 March 2015

Watermelon Floats

© Melissa Gaggiano

    I am rockin' on a watermelon roll. Having just released a new print with, as you can guess it, a watermelon theme. My watermelon print is available on a varied number of mediums from wall art to pants. Check it out!

© Melissa Gaggiano
Watermelon Floats
Available at Red Bubble

© Melissa Gaggiano
Watermelon Floats
Available at Red Bubble

Thursday, 26 March 2015

Swiss Lime & Grey

Swiss Lime & Grey design
© Melissa Gaggiano

    I have created something a bit different. Available in my Red Bubble store is a new pattern, which I have called Swiss Lime & Grey. It is available in a variety of mediums - wall art, phone & laptop covers, bags, pillows, duvet covers annnnnd leggings.

Saturday, 10 April 2010

Dress Pattern Rewind

I am feeling rather inspired by One Crafty Mamma who, over the past few days has been sharing footage of her homemade Blythe doll dresses…

Waaaaayyyyyy back in 2007 I was just so totally Bratz mad and I designed this red Bratz doll dress. It was meant to be a funky, evening look.


I have decided to share with you the pattern which will suit a Bratz doll, and any doll with a similar body shape (such as Blythe). So here it is:


And don't forget to check out One Crafty Mamma — a fabulously inspirational blog.

Tuesday, 4 August 2009

Cute Crochet Capelets

For all those crochet crafters out there I must insist you visit the Artdecadence Etsy store, which is run by artist, Christine McConnell. There is a pattern for a sweet little capelet that you can buy. If these photos are anything to go by, this outfit would make a wonderful addition to any girl's wardrobe.


While you are at it you can also check out Chrisy's blog over at sophismpress.blogspot.com

Sunday, 2 August 2009

The Gwendo Bib


Okay! I've got something special to share with y'all. The other day I designed and made for my baby a lil bundle of baby bibs. Why did I do this? Well, firstly my bub needed more larger bibs and I thought the cost of bibs in shops was a bit much for such a simple design.

Instead, I made a pattern, bought 2 metres of knitted fabric (1 metre per alternating fabric colour/print), and sew on velcro. I was able to make 9 bibs with some scrap material to spare for another potential project.

A couple of the bibs were taken out for a test drive last night. Translation: the bub wore the bib. The bib survived.

I am going to share my bib pattern with you. It is a very simple design and can be sewn up by even the most amateur crafter.
Sewing Steps:
  1. Cut 2 pieces of fabric on CF Fold.
  2. Open out the two pieces you just cut, and place the pieces, with the wrong sides of fabric together.
  3. Plain stitch the two pieces together about 1 cm - 1.5 cm from the edge.
  4. Reinforce the edges with an overlocker.*
  5. Cut a small piece of velcro, about 2 cm from the velcro roll.
  6. Stitch the velcro pieces to the fabric where the X is marked on the pattern.
* Note: If you do not have an overlocker or are a more advanced sewing machinist, you can reinforce the edges of the bib by sewing in binding. If you do this I would suggest cutting a piece of knitted fabric that has a 3 cm width, by 97 cm length.

Monday, 27 July 2009

The Beret Is On

Is your head feeling just a bit cold and exposed when you step outside this winter?

Well if so, no longer will you need to freeze your cute lil head off. There is a fabulous, free pattern for crocheting a beret over here.


This beret is designed and presented by the Mysterious M of Melbourne. Check out her whole blog over at http://emmstarr.blogspot.com/

Sunday, 12 July 2009

Have a Cow!

Seriously do have a cow. Or if you wanted one, how about a pig.


I just stumbled across a free Burda pattern for felt hand puppets, as pictured above. To get your hands on the patterns for these gorgeous little animals simply follow this link. You will need to register with Burda, which is exactly what I did and it was totally worth it just to get these puppet patterns.

Now, get out there and check it out!

Friday, 17 April 2009

My Creative Space...

My Creative Space

My creative space for today, displays the new plush doll I am to create. It is a design of my own named "Hoo Owl". In the photo you can see the fabric I intend to use, the pattern pieces and an illustration of how I imagined the "Hoo Owl". If it goes well I should be able to make a handful of these little owls. I am so looking forward to getting started on this project.

Friday, 20 February 2009

Banana Bubble World

This morning I felt the creative impulse which resulted in the creation of the below patterns. Altogether it took me less than an hour to create these images.

Banana Fence 1

Banana Fence 2

Banana Fence 3

Banana Fence 4

Banana Fence 5

Sunday, 27 July 2008

Another Design Idea


This is a more recent piece of Photoshop art that I have created based on a snowflake brush pattern I created. This pattern would make a great wood carved wall for inside the home or even an iron grill wall in the garden.