Showing posts with label paper crafts. Show all posts

Thursday, 23 July 2015

Rocket Ship

© Melissa Gaggiano


Materials
  • Empty toilet paper cylinder
  • Foil
  • Red paper/card
  • Scissors
  • Pencil
  • String or yarn


Steps

1. Wrinkle up the foil to create texture, then carefully unwrap and smooth out.
2. Wrap the foil around the T.P. cylinder. Tuck the foil up into one end of the cylinder.
3. Close the other end of the cylinder by twisting the foil into a point. This will be the top end of your rocket.
Steps 1-3

4. Cut four small incisions into the bottom of the cylinder, making four equal quadrants. Each incision need only be about 1cm.
Step 4

5. Draw an outline of a rocket blast onto a scrap piece of red card. Place a second piece of card to the first piece and cut out the flame outline. Make sure the width of the flame is a bit wider than the rocket cylinder.
6. Separate the two flame shapes. Cut an incision up to the middle on one flame. Cut an incision down to the middle on the second flame.
Steps 5-6

7. Bring the two flame pieces together via the intersecting incisions just made. From a birds-eye-view the flame will look like an X.
Step 7

8. Push each section of the flame up into the four rocket incisions. 
Step 8

9. Tie the end of string to the nose of the rocket ship, and now she is ready to fly.

* Bonus steps: 
  • You could paint the finished, foiled rocket. 
  • Have the rocket as part of a mobile installation.
  • Cut out stars, glue to string and have the string dangling to the rocket.

Thursday, 14 November 2013

Boxing Kangaroos - Paper Craft

Expo 88: Japanese paper craft
    Okay, so who remembers Expo 88? I do. Of course it is certainly difficult to forget as I have so much memorabilia to remind me of the event.
    There were many pavilions representing different nations from around the world. My most favourite being the Japanese pavilion. There were pretty Japanese representatives, gardens, origami [with an Australian theme], plus a cute mobile robot that stamped your pavilion passport.
    One of the pieces of memorabilia that I have left over from this event is this kangaroo paper craft toy, which you can download and keep for a rainy day. I made this paper toy when I was a kids and it was a lot of fun [and kept me busy].

Note: I recommend printing onto medium-heavy paper. Or alternatively printing on regular paper, and then gluing to cardboard.

Wednesday, 6 November 2013

Penny Paper Doll

    I have only just finished making a paper doll. Her name is Penny and you can download and print her for free.
    I recommend printing onto a thick paper so Penny will stand up after you cut her out [if not, print onto regular paper then glue to cardboard before cutting. Cut as close to her body as possible, and cut along the line near her feet. Wrap this rectangular section into a cylinder shape and tape the edges together.
    Additional enhancements: I kept the skin clear, so that it can be coloured in to be any tone you like.


Illustraiton by Melissa Gaggiano.

Illustraiton by Melissa Gaggiano.

Illustraiton by Melissa Gaggiano.

Illustraiton by Melissa Gaggiano.


Tuesday, 9 April 2013

Washi Ningyo

Link to
    I just stumbled across these gorgeous Japanese 3D paper dolls. If you love paper, and you love dolls, then you'll love these precious little pieces. These dolls are by Dust of Enchantment artist - Tracy Zagniotova.
    There is a lot of wonderful I could say about Tracy, but honestly she says it best. So I'll share her links, and you can have a read for yourself.

Monday, 1 April 2013

Paper Dolls & Beds


Craft & Photography by Melissa Gaggiano.
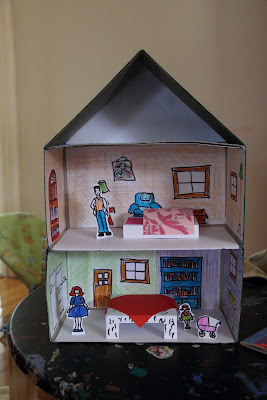
    A fair while ago I crafted out of tissue boxes an economical doll house [you will find the tutorial for this here].  The doll house was well loved and eventually had to be retired, but not without saving some parts for another doll house - such as the hand illustrated walls.
    Recently my eldest was pressing for another homemade doll house. This time I handed over creative control to my daughter, letting her decorate the joined tissue boxes with paint, feathers and cut up fashion magazines.
    The doll house was built but something was missing. It was sadly in need of people. So I made a paper doll family, including a cat.
    Alas the paper family needed a bed to sleep in. Again, out came the cardboard, pencil, pen, cutting board and what not. And the above beds were made with a some thought, and very little difficulty on my part. I had fun making the people and beds.

Saturday, 2 March 2013

Of Owls and Pirates

    March would appear a time of change. A new month clicks over and the weather suddenly realises that it is not meant to be hitting us with 35° plus days. Thank the goddess for the cool change. 
    The other day, wanting an opportunity to do something crafty with my eldest I found a wonderfully easy paper owl activity. Together we made a team - I cut, my eldest glued. We now have four paper owls decorating her bed and she has plans to add more owls to her collective. We'll probably be doing that next week.

    Click here for the paper owl tutorial.


    I have also been designing and sewing a pirate costume for my eldest's pirate dress up day coming up at kinder. I made a pair of elasticated pants, a sleeveless jacket and a felted heart eye patch. I am pleased to say that not an extra cent was spent, as I used the materials already in my possession.

Original pirate concept.

Finished pirate garment.

Saturday, 5 January 2013

Béatrice Coron Inspires

    I just came across an inspiring paper cut artist, by the name of Béatrice Coron. As soon as I saw just one of her pieces I was instantly drawn into the image and the story contained within.
    Following is a link to Béatrice's work, as well as a video which takes a look at how Béatrice creates her images.


Thursday, 1 November 2012

Where I Am At

    I am having a quiet moment so thought I'd share where things are at. Things have been on the quiet side and yet I am just a little bit busy. Though it doesn't feel like it for some strange reason. Maybe it is because I am taking small bites here and there from my individual projects. So this is where it is at...
  1. Reading Out of Africa, by Karen Blixen.
  2. Listening to audio recording of Twilight on those late warm nights when I cannot sleep.
  3. Discovered this wonderful website filled with creative kids activities - www.learning4kids.net.
  4. Mixed rice and food dye as a sensory play item for my eldest. She loves it, and is playing with the rice as I type.
  5. I am about to embark on a crochet project - making pizza slices.
  6. Writing a story, just small bits at a time.
  7. Drawing doll concepts.
  8. Helping my eldest make paper badges.
  9. Doing a photography course [but taking a few days break from the annoying gray card stuff].

Layout by Melissa Gaggiano.

Sensory play using rice and food dye. I cam across this at www.learning4kids.net.

Doll concept sketching by Melissa Gaggiano.

Friday, 27 July 2012

Iacta Alea Est Sweetie

    If you are anything like me you are a die in the cast Dr Who fan. And have no doubt enjoyed the rescusitated series of Dr Who in the previous few years.
    River Song is one of my most favourite companions for The Doctor. I mean if I were to express the awesomeness of this character we would be here all day.
    One or River's accessories which captured my attention in the very first episode that we ever see of her, was her TARDIS journal. It had an old, used, homemade aesthetic about it. I knew as soon as I saw that book I wanted it.
    As luck would have it BBC have provided a DIY tutorial so that you too can have your very own TARDIS journal. Just in case The Doctor himself comes crashing through your door tomorrow declaring that he needs your help to save the universe from total and near irrepairable destruction.


    P.S. I learnt that'iacta alea est' is Latin for 'die in the cast'.

Friday, 22 June 2012

Doll House Tutorial [Updated]

    A while ago I provided a basic, easy to follow tutorial for making a doll house out of tissue boxes. Well today I thought I'd provide a special follow up. Along with the original tutorial I am also including wall paper line art which you can print out and stick to the inside walls of the doll house. And voila! You have instant room detail which can be coloured in if so desired.


    Here is something to do on a rainy day - a papercraft doll house.
    You can use the following photos [which document my doll house construction process] to make your own doll house. All you need are two tissue boxes [or as many as you wish], paper, card, textas and pencils, scissors, sticky tape, ruler and paint. This sounds like a lot, but you can simply use any scrap paper or card you have about your house. Think green! For instance, to make the roofline you could use last year's Chrismas cards.

Cut off the top/lid of the tissue box.

Tape together the two tissue boxes.
Stick down trimmed paper for the floor and ceilings.

Looking good.

Draw on to trimmed paper some wall details.
There are three walls per room/tissue box.
Use a ruler to get an estimate of how much to trim the paper.
Colour in the wall details.
* If you are not a confident illustrator you may print out the following six templates for the inside walls of the doll house.

Print this template out and colour in.

Print this template out and colour in.

Print this template out and colour in.

Print this template out and colour in.

Print this template out and colour in.

Print this template out and colour in.


Stick the wall details into the tissue box.
Fold scrap card in half and tape to the top tissue box,
creating a triangular roofline.

Still looking good.

Oh yeah!

Cut a triangle piece of paper/card same size as the roof,
and glue to the back, thus creating an attic.

Now you can paint the exterior of the house.
If you have a variety of paints, try something creative
with extra details - windows, doors, flowerbeds.
With your left over card do some cutting and folding
and you've got some basic furniture - like
a bed or a table.
Oh! And don't forget some little paper people
to live in the lovely paper house.

Tah-dah! She loves it.

Drop me a line if you try this rainy day papercraft project. I'd love to see how it went.

Saturday, 21 April 2012

The Gwen-Paper-Dolyn

    This is by no means a tutorial, but I thought I'd share with you the progress of a paper doll which had been made for my eldest [at her request]. Perhaps at some later stage when I have perfected the paper doll I will go about creating a tutorial for this one.

In the beginning, a template was drawn.

The template was coloured in and cut out.

And finally, the base was taped into a cylinder and the dress was
placed over the body.


Tuesday, 10 April 2012

DIY Cardboard Car


Photography by Melissa Gaggiano
    Today my eldest quite literally presented me with a challenge. She handed to me two empty toilet rolls and asked me to turn it into a car. So I say 'leave it to me and I'll think of something'.
    So as you can imagine, today's tutorial is all about making a cardboard car.

What materials do you need?
  • 2 empty toilet rolls
  • cardboard [it can come off a box, even a cereal box]
  • art knive
  • acrylic paint and paint brush
  • texta
Instructions:

1. Draw an outline of a car on to two pieces of cardboard.

2. Cut out both car outlines.

3. Thinly paint the two car outlines with acrylic paint.


4. Allow the car outlines to dry.


5. Cut into each toilet roll 2.5 cm from each end.
Ensure the cuts only go halfway the rolls.

6. Slide the car outlines into the rolls.
The rolls will now become the wheels of the car.

7. The car is now ready to be raced.